Introduction: Transform Your Bathroom with Sparkling Shower Doors
Nothing beats the feeling of stepping into a bright, clean bathroom. But over time, shower doors can become grimy, soap scum builds up, and water stains mar their shine. If you've ever wondered how to clean shower doors effectively, you're not alone. Fortunately, with the right products and techniques, achieving crystal-clear doors is easier than you might think. In this guide, we'll explore how to properly clean your shower doors using the popular Bring It On Cleaner. Get ready to restore your bathroom’s sparkle!
Why Choose Bring It On Cleaner for Your Shower Doors?
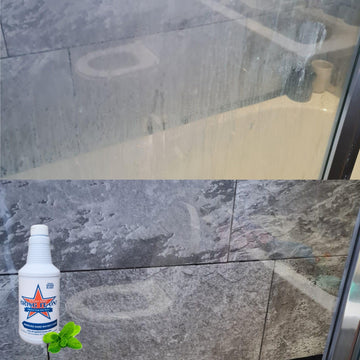
When it comes to cleaning shower doors, selecting the right cleaner is crucial. Bring It On Cleaner stands out for its powerful stain removal, eco-friendly ingredients, and versatility. It’s designed to tackle soap scum, hard water stains, and grime without harsh fumes or damage to your glass. Plus, its user-friendly spray bottle makes application straightforward, making your cleaning routine quicker and more effective.
Preparing for the Cleaning Process
Gather Your Supplies
Before diving into the cleaning process, gather the necessary supplies:
- Bring It On Cleaner
- Soft microfiber cloths or non-abrasive sponges
- Old toothbrush or small scrub brush
- Rubber gloves for protection
- Dry towels or microfiber cloths for drying
Before You Start: Prepare the Area
To ensure safety and avoid damage, make sure the bathroom is well-ventilated. Open windows or turn on the exhaust fan. Remove any shower accessories, soap dishes, and personal items from the shower area. Wet the shower doors with warm water to loosen grime before applying the cleaner—that helps improve its effectiveness.
Step-by-Step Guide on How to Clean Shower Doors with Bring It On Cleaner
Step 1: Apply the Cleaner Generously
Start by applying Bring It On Cleaner liberally onto the entire surface of the shower doors. Focus on areas with visible soap scum and water stains. For stubborn spots, let the cleaner sit for 5-10 minutes to break down the grime—this allows the powerful formula to work its magic.
Step 2: Let It Sit and Break Down Grime
Patience is key. During this time, you can take the opportunity to clean other bathroom surfaces or prepare your cleaning tools. The longer the cleaner sits, the more effectively it dissolves soap scum and mineral deposits.
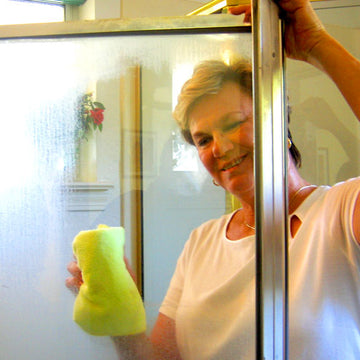
Step 3: Agitate with a Soft Cloth or Brush
Use a soft microfiber cloth or non-abrasive sponge to gently scrub the glass. For tight spots or edges, an old toothbrush can be very effective. Be gentle to avoid scratching the glass but thorough enough to remove residues. If needed, reapply the cleaner to particularly stubborn patches.
Step 4: Rinse Properly
Once you've scrubbed away the grime, rinse the shower doors thoroughly with warm water. Make sure all traces of the cleaner and loosened dirt are washed off. Residual cleaner can cause streaks or attract new grime if left on the surface.
Step 5: Dry and Polish for a Spotless Finish
Use a dry microfiber cloth or towel to dry the shower doors. This step prevents water spots and enhances the shine of your glass. For an extra gloss, you can buff the doors with a clean, dry cloth, or even apply a glass treatment for longer-lasting clarity.
Extra Tips for Maintaining Clean Shower Doors
Routine Cleaning
Make it a habit to wipe down your shower doors with a squeegee or microfiber cloth after each use. This simple step greatly reduces soap scum and mineral buildup, making deep cleaning easier and less frequent.
Use of Natural Alternatives
If you prefer natural cleaning solutions, mix equal parts of distilled white vinegar and water. Spray it onto the glass, let sit for a few minutes, then scrub and rinse. Combining vinegar with Bring It On Cleaner occasionally can give you an extra boost against hard water stains.
Preventative Measures
Installing a water softener can reduce mineral deposits. Also, keep your bathroom well-ventilated to help moisture evaporate quickly, preventing mold and mildew from forming on the glass.
Common Mistakes to Avoid When Cleaning Shower Doors
- Using abrasive scrubbers that can scratch the glass.
- Applying too much pressure while scrubbing, which can damage the surface.
- Skipping rinsing, leaving cleaner residues that attract dirt.
- Cleaning infrequently, allowing buildup to become harder to remove.
Conclusion: Achieve Sparkling, Spotless Shower Doors
Learning how to clean shower doors effectively doesn’t have to be complicated or time-consuming. With Bring It On Cleaner, you have a powerful, easy-to-use solution that can transform those cloudy, streaky doors into clear, shiny glass. Regular maintenance combined with proper cleaning techniques ensures your bathroom stays fresh, inviting, and beautiful every day. Give these steps a try, and enjoy the satisfaction of sparkling, squeaky-clean shower doors!
Make sure to properly apply a sealant to the glass once cleaned. Here is Bring It On Cleaner's sister products Protect-Shield Water Repellant.