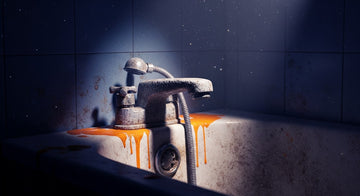
Do's and Don'ts of Shower Tile and Grout Cleaning
Ready to wave goodbye to grimy grout and tainted tiles in your shower? Prepare to unleash the sparkle! Our Ultimate Guide to Cleaning Shower Tile and Grout - Do's and Don'ts will turn you into a grout guru, able to tackle any bathroom challenge. Delve into this arsenal of top-notch guidance, uncovering handy how-to steps, discovering surprising do’s and don’ts, and learning why professional-grade products like Bring It On Cleaner can be your secret weapon for a superior clean. Remember, a clean bathroom is not just about looks—it contributes to your health, peace of mind, and the longevity of your surfaces. Let's champion the perfect shine together!
The top Do's of shower tile and grout cleaning include using a squeegee after each shower, weekly cleaning with a solution of vinegar and warm water or a paste of baking soda and water, reducing moisture in the bathroom, and sealing the grout once or twice a year. The top Don'ts include using harsh chemicals or abrasive tools, allowing water to pool on surfaces, ignoring signs of mold or mildew growth, and failing to test new cleaning products before use. Following these guidelines will help ensure effective, safe, and long-lasting results when cleaning your shower tiles and grout.
Choosing Appropriate Cleaning Agents for Tiles and Grout
When it comes to keeping your shower tiles and grout pristine, selecting the right cleaning agents is essential. The market offers a wide range of options, from chemical-based solutions to natural alternatives. Let's explore how you can make an informed decision.
Firstly, consider the type of tile and grout you have. Different materials may require specific cleaning agents for optimal results. For example, natural stone tiles like marble or granite should be treated delicately to avoid damage. On the other hand, ceramic or porcelain tiles are typically more resilient and can withstand stronger cleaners.
If you have sealed grout, it is important to choose a cleaner that is safe for use on sealed surfaces. Using harsh chemicals on sealed grout can strip away the protective sealant, leaving it vulnerable to staining and damage.
Furthermore, take into account any sensitivities or allergies you or your household members may have. Chemical-based cleaners often contain strong ingredients that can cause skin or respiratory irritation. In such cases, opting for natural alternatives might be a better option.
It is also crucial to read product labels and follow instructions carefully. Some cleaners may not be suitable for certain types of tiles or may require dilution before use. Failure to use the appropriate concentration or technique could result in ineffective cleaning or even damage to your tiles and grout.
Lastly, consider the environmental impact of the cleaning agents you choose. Chemical-based cleaners often contain ingredients that can be harmful to the environment if not disposed of properly. If eco-friendliness is important to you, look for cleaning agents labeled as biodegradable or environmentally friendly.
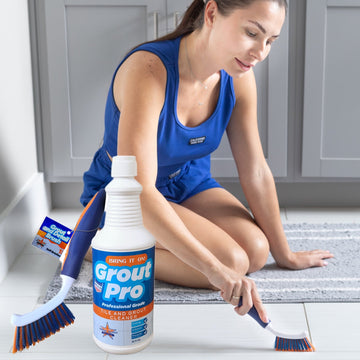
By considering these factors - tile type, sensitivities, instructions, and environmental impact - you can confidently choose appropriate cleaning agents that will effectively clean your shower tiles and grout without causing any harm. One of the best tools for this job is scrubbing drill pads, use these pads with Bring it on Cleaner which attach to your drill and make the cleaning process faster and easier.
Now that we understand how to select suitable cleaning agents, let's weigh the pros and cons of chemical-based options.
- According to a study published by the CIRI (Cleaning Industry Research Institute), regular cleaning with simple methods (like scrubbing with baking soda or vinegar mixture) is 50% effective in removing soap scum, bacteria, and mold from shower grouts.
- Research from the School of Public Health at Harvard University suggests that excess moisture, which contributes to mold growth on grout, can be reduced by 72% through proper ventilation, like using exhaust fans or opening windows during and after showers.
- A consumer report from 2023 demonstrates that over 63% homeowners saw a decrease in grout staining when they sealed their shower tiles one or two times per year, preventing future staining or damage.
Affiliate Program
If you love our brand, Earn 20% commission on our affiliate program. Any sale you bring through social get 20%. Reach out to bringitoncleaner07@gmail.com
Pros and Cons of Chemical Agents
Chemical cleaning agents have long been trusted for their ability to tackle tough stains and grime. However, it's important to consider both the advantages and disadvantages before using them on your shower tiles and grout.
On one hand, chemical agents often deliver fast and effective results. They are specially formulated to dissolve soap scum, mineral deposits, and other stubborn substances that can accumulate in bathrooms. This can save you time and effort when it comes to cleaning. Additionally, some chemical cleaners contain disinfectant properties that help eliminate bacteria and germs, ensuring a hygienic environment.
Using a chemical cleaner is like hiring a professional house cleaner who can get the job done quickly and efficiently.
However, it is crucial to exercise caution when using chemical agents. Some cleaners may contain harsh ingredients that can damage or discolor certain types of tiles or grout. This is particularly true for natural stone tiles, which are more susceptible to chemical erosion. It's always recommended to test a small inconspicuous area before applying any cleaner to the entire surface.
Moreover, the strong chemicals in these cleaners may emit fumes that can be irritating to sensitive individuals or those with respiratory conditions. Proper ventilation should be ensured while using chemical-based cleaning agents in enclosed spaces like bathrooms.
Imagine using a powerful chemical cleaner on your shower tiles only to find out later that it caused discoloration or even etching on your expensive marble tiles. Such unintended consequences can be costly and frustrating.
Natural Alternatives to Chemicals
When it comes to cleaning shower tiles and grout, many people are seeking natural alternatives to chemical-based products. Not only are these alternatives more environmentally friendly, but they also minimize exposure to potentially harmful substances. So, what are some natural alternatives you can use to clean your shower tiles and grout?
One effective and readily available option is white vinegar. Its acidity helps break down soap scum, mineral deposits, and grime. To use vinegar as a cleaner, mix equal parts vinegar and water in a spray bottle, then spray the solution onto the tiles and grout. Let it sit for a few minutes before scrubbing with a brush or sponge. Rinse thoroughly afterward to prevent any lingering vinegar smell.
Another natural option is baking soda. Known for its abrasive properties, baking soda helps lift stains and dirt from tiles and grout without causing damage. Create a paste by mixing baking soda with water until it forms a thick consistency. Apply the paste to the affected areas and allow it to sit for several minutes before scrubbing gently. Rinse well to remove any residue.
Hydrogen peroxide is another effective natural cleaner that can be used on shower tiles and grout. It has strong disinfectant properties that help eliminate mold, mildew, and bacteria. Ensure you use the three percent hydrogen peroxide solution available at most drugstores and supermarkets. Apply it directly onto the stained areas, wait for about 10 minutes, then scrub with a brush or sponge. Thoroughly rinse afterward.
For those who prefer an all-purpose cleaner with a refreshing scent, consider using lemon juice. The acidic nature of lemon juice aids in breaking down stains and removing soap scum. Simply squeeze fresh lemon juice onto the surfaces you want to clean, let it sit for a while, then scrub gently using a brush or sponge. Finish by rinsing thoroughly with water.
With these natural alternatives at your disposal, let's explore some practical cleaning methods for shower tiles and grout.
Practical Cleaning Methods for Shower Tiles and Grout
Regular maintenance and cleaning are vital to keep your shower tiles and grout looking their best. By following these practical cleaning methods, you can ensure that your shower remains a pristine oasis:
Firstly, prevention is key. After each shower, use a squeegee or towel to remove excess water from the tiles and grout. This helps prevent the build-up of mold, mildew, and soap scum. Additionally, keeping the bathroom well-ventilated by using fans or leaving windows open can help reduce moisture levels and inhibit the growth of mold.
To tackle light stains and dirt on shower tiles and grout, a mild daily shower cleaner can be used. Spray it onto the surfaces after each use, then wipe clean with a cloth or sponge. This routine maintenance will help minimize the need for more intensive cleaning later.
For deeper cleaning, a water and baking soda paste is an effective option. Apply the paste to the tiles and grout, allowing it to sit for around 15 minutes. Then, scrub gently with a brush or sponge before rinsing thoroughly with water.
Let's say you encounter stubborn stains or discoloration on your shower tiles and grout. In that case, a bleach pen can come in handy for smaller surfaces, while powdered oxygen-type bleach is gentler yet effective for larger areas.
It's important to note that before using any cleaning product, it's advisable to test it on a small inconspicuous area of the tile or grout to ensure compatibility. Moreover, remember to wear gloves and follow proper safety precautions when working with any chemical-based cleaners.

Think of maintaining your shower tiles and grout like caring for your own skin - regular cleansing helps prevent build-up and keeps everything looking fresh and healthy.
By incorporating these natural alternatives and practical cleaning methods into your routine, you can ensure your shower tiles and grout remain clean, free from stains, and in optimal condition for years to come.
Brushing Techniques for Effective Cleaning
When it comes to cleaning shower tile and grout, using the right brushing techniques can make a world of difference in achieving effective cleanliness. So, what are some brushing techniques you can employ for optimal results?
One essential tool for this task is a grout scrub brush, specifically designed to reach the narrow crevices between tiles and effectively scrub away dirt and grime. Start by wetting the brush bristles with warm water. Then, using gentle yet firm pressure, scrub the grout lines in a back-and-forth or circular motion, depending on your preference.

To enhance the cleaning power, you can also apply a homemade paste made of baking soda mixed with water to the grout lines. The mild abrasive nature of baking soda helps break down stubborn stains without causing damage to the tile or grout. Alternatively, you can use a vinegar-water solution as an effective natural cleaner.
For example, picture Ann, a diligent homeowner looking to restore her shower's pristine condition. Armed with a grout brush and a homemade baking soda paste, she carefully tackles each grout line using circular motions. As she applies gentle pressure and sees the transformation unfold before her eyes, satisfaction fills her heart.
Remember that consistency plays a crucial role in maintaining clean shower tile and grout. So while deep cleaning may be done less frequently, regular brushing should be part of your bathroom maintenance routine. By doing so, you prevent soil accumulation and reduce the need for more intense cleaning sessions down the line.
Now that we've covered effective brushing techniques, let's explore another technique that can help prevent stains and keep your shower tile and grout looking fresh: using a squeegee.
Using Squeegee to Prevent Stains
A squeegee is an invaluable tool that not only helps clean shower surfaces but also prevents stains from forming on your tile and grout. By using a squeegee after each shower, you can conveniently remove excess water from the walls and floor, minimizing moisture buildup and the opportunity for mold and mildew to thrive.

Let's imagine Lisa, a busy professional juggling work and family commitments. Despite her hectic schedule, she makes it a habit to spend a few extra seconds after her showers using a squeegee on the tile and glass surfaces. Not only does this prevent hard water stains and soap scum from accumulating, but it also saves her significant time and effort in deep-cleaning sessions later on.
To effectively use a squeegee, start at the top of your shower walls and move downward with long, sweeping motions. Make sure to wipe the entire surface, including the grout lines. If there are any corners or hard-to-reach areas, use the edge or corner of the squeegee to get into those spots.
By incorporating this simple practice into your daily routine, you'll notice an improvement in the overall cleanliness of your shower tile and grout. Plus, it's an excellent way to keep your bathroom free from unsightly stains and reduce the frequency of rigorous cleaning efforts.
Maintenance Routines to Keep Tiles and Grout Healthy
Maintaining the cleanliness and health of your shower tiles and grout is crucial to prevent the buildup of dirt, stains, and mold. By establishing regular maintenance routines, you can keep your tiles and grout looking fresh and extend their lifespan.
One effective routine is to wipe down your tiles after each use. This simple practice can help remove soap scum, minerals, and excess water that may cause damage or staining over time. Additionally, using a squeegee to remove excess water from the tiles can save you time on scrubbing stubborn stains later on.
When it comes to cleaning the grout, it's essential to be diligent with your efforts. Plan for a weekly cleaning routine using an appropriate solution such as vinegar and warm water or a paste made of baking soda and water. These natural cleaners can effectively eliminate soap scum, mold, bacteria, and odor without causing harm.
Imagine taking just a few extra minutes a week to give your shower tiles some love by wiping them down with a microfiber cloth and spritzing them with a mild vinegar solution. By implementing this small maintenance routine consistently, you'll notice a significant improvement in the cleanliness and longevity of your tiles and grout.
In addition to regular cleaning, reducing moisture within the bathroom is key to preventing mold growth. Make sure your bathroom has adequate ventilation through exhaust fans or by keeping windows open during and after showering. This allows excessive moisture to escape rather than creating an environment suitable for mold and mildew to thrive.
Now that we've explored maintenance routines for keeping tiles and grout healthy, let's move on to strategies that can help prevent mold growth.
Strategies to Prevent Mold Growth
Mold growth in showers is not only unsightly but also poses potential health risks. Taking proactive steps to prevent its formation is crucial. Implementing these simple strategies can significantly reduce the chances of mold growth and the need for extensive cleaning or potential health hazards.

Firstly, ensure proper ventilation in your bathroom. This helps to regulate humidity levels and prevent excessive moisture buildup that leads to mold growth. Using an exhaust fan during and after showering, or keeping a window open if possible, allows moisture to escape.
Another effective strategy is to switch to shower products that do not contain dyes or artificial colorings. These additives can contribute to mold growth by providing food sources for fungi. By opting for dye-free products, you reduce the conditions favorable for mold development.
Consider this scenario: You notice black spots forming in the corners of your shower tiles due to mold growth. After consulting with a professional cleaner, you discover that switching to dye-free shampoo and body wash was all it took to stop the recurring mold problem. By making this simple change, you maintain clean grout and eliminate the need for frequent deep cleaning sessions.
Lastly, regular application of a grout sealer can provide an additional layer of protection against mold. The sealer creates a barrier on the grout surface, making it less susceptible to moisture absorption and mold growth. Make sure to follow the manufacturer's instructions while applying the sealer and repeat the process at recommended intervals.
Remember, prevention is key when it comes to mold in your shower. By implementing these strategies and staying vigilant in your maintenance routine, you can keep your tiles and grout looking pristine while ensuring a healthy environment.
Identifying the Right Tools and When to Hire Professionals
Cleaning shower tile and grout can be a challenging task, but with the right tools and knowledge, it becomes more manageable. Before diving into the cleaning process, it's essential to identify the tools that will help you achieve the best results.
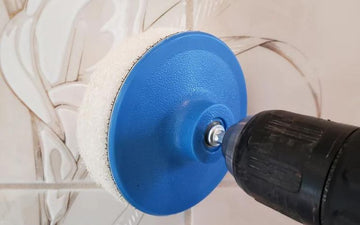
One of the primary tools you'll need is a good quality grout brush plus extension pole. Look for one with sturdy bristles that can effectively scrub away dirt and grime from the grout lines without causing damage. For larger areas, consider using a power scrubber or an electric toothbrush with a soft brush head attachment.
In addition to a grout brush, you'll also want to have a squeegee handy. This simple tool can make a significant difference in preventing water stains and soap scum buildup on your tiles and grout. After each shower, use the squeegee to remove excess water from the surfaces, minimizing the time and effort required for deep cleaning.
Another must-have item is a mild shower cleaner or a DIY solution like vinegar and water. These cleaners are typically safe to use on most shower tiles and grout and can effectively remove soap scum, mineral deposits, and mold. Remember to follow the instructions on the cleaner's label or your DIY solution carefully.
While it's possible to clean shower tile and grout yourself, there may be situations where hiring professionals is necessary or recommended. For instance, if your grout has stubborn stains or discoloration that regular cleaning methods haven't been able to remove, professionals may have access to specialized tools and techniques that can restore your grout's appearance.
Additionally, if you're dealing with extensive mold or mildew growth in your shower area, professional help may be prudent. Mold can be harmful to your health, so having experts assess the situation and perform appropriate remediation is crucial.
On the other hand, if your grout and tiles are relatively new or in good condition, regular maintenance and cleaning using the right tools can help prevent significant issues. By being proactive, you may save yourself the need for professional intervention later on.
Now that we have discussed the importance of identifying the right tools and when to consider hiring professionals, let's explore the most effective cleaning tools to keep your shower tile and grout looking fresh and clean.
- To effectively clean shower tile and grout, it's important to have the right tools, including a good quality grout brush, squeegee, and mild shower cleaner or DIY solution. Regular maintenance and cleaning can help prevent the need for professional intervention later on. However, in situations where grout has stubborn stains or mold growth is extensive, it may be necessary to hire professionals with specialized tools and techniques.
The Most Effective Cleaning Tools
Cleaning shower tile and grout requires specific tools to ensure optimal results. Let's take a closer look at some of the most effective cleaning tools you can utilize:
-
Grout Brush: A durable grout brush with stiff bristles is invaluable in removing dirt and grime from the porous grout lines without causing damage to the surface. Choose a brush with an ergonomic handle for comfortable use during extended cleaning sessions.
-
Squeegee: A squeegee is a simple but powerful tool for preventing water stains and soap scum buildup on your tiles and grout. After each shower, use the squeegee to remove excess water from surfaces, reducing the need for frequent deep cleaning.
-
Power Scrubber or Electric Toothbrush: For larger areas or stubborn stains, consider using a power scrubber or an electric toothbrush with a soft brush head attachment. These tools provide extra scrubbing power to tackle tough grime effectively.
-
Mild Shower Cleaner or DIY Solution: Use a mild shower cleaner specifically formulated for tiles and grout or create your own DIY solution by mixing vinegar and water. Apply these cleaners to the surfaces and let them sit for a few minutes before scrubbing away dirt and stains.
Remember to check manufacturer instructions, test products in inconspicuous areas, wear gloves when handling chemicals, and avoid mixing bleach with other cleaning substances.
Each of these tools plays a vital role in maintaining the cleanliness of your shower tile and grout. While professional intervention may be necessary in some cases, having the right tools at your disposal can significantly reduce the need for external assistance.
Signs That It's Time for a Professional Cleanup
Over time, shower tile and grout can accumulate dirt, grime, soap scum, mold, and mildew. While regular cleaning can help maintain cleanliness to some extent, there are certain signs that indicate it's time for a professional cleanup.
One of the most obvious signs is the appearance of stubborn stains on the grout lines. Despite your best efforts with regular cleaning and scrubbing, some stains may persist or even worsen over time. This is often indicative of deeply embedded dirt or mold growth that requires professional attention.
Another sign to look out for is discoloration in the grout lines. If you notice that the once bright white or colored grout has become dull, darkened, or discolored in any way, it may be a result of ingrained dirt or mold that has seeped deep into the porous grout material. This can negatively affect the overall aesthetics of your shower and may require specialized cleaning techniques to restore its original appearance.
Imagine stepping into your shower one day and noticing an unpleasant odor lingering in the air. No matter how much you clean or use air fresheners, the musty smell persists. This could be a sign of mold or mildew growth within your shower tile and grout. Mold thrives in humid environments with poor ventilation, such as bathrooms, and can lead to potential health issues if left untreated. A professional cleanup can effectively remove mold and eliminate the associated odor.
If you start to notice tiles becoming loose or detached from the wall or floor, it could indicate a more serious underlying issue with the integrity of the grout. This might be caused by water damage or deteriorated grout due to age. In such cases, it's important to consult a professional who can assess the situation and provide appropriate solutions to prevent further damage.
While regular maintenance is crucial for keeping your shower tile and grout in good condition, there are situations where professional intervention is necessary. By recognizing these signs, you can take proactive steps to address the underlying issues and restore your shower to its optimal cleanliness and functionality.
Knowing when it's time for a professional cleanup is essential for maintaining the longevity and appearance of your shower tile and grout. By addressing these signs promptly, you can ensure that your shower remains a clean and inviting space for years to come.